 In this newest edition of InDesign Tips, we bring you one super utilitarian tip and two plain old fun ones. These helpful features should save you some time and get you thinking of new ways of using InDesign!
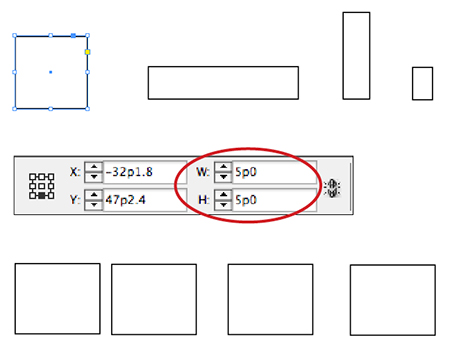 1. Select one of the objects you want have the same dimensions.
2. Set the desired width and height of that object, using the Control or Transform Panel.
3. Select the remaining objects and go to Object> Transform Again> Transform Again Individually. The other objects will take on the exact same dimensions as the first object. Easy!
 Here’s how it works:
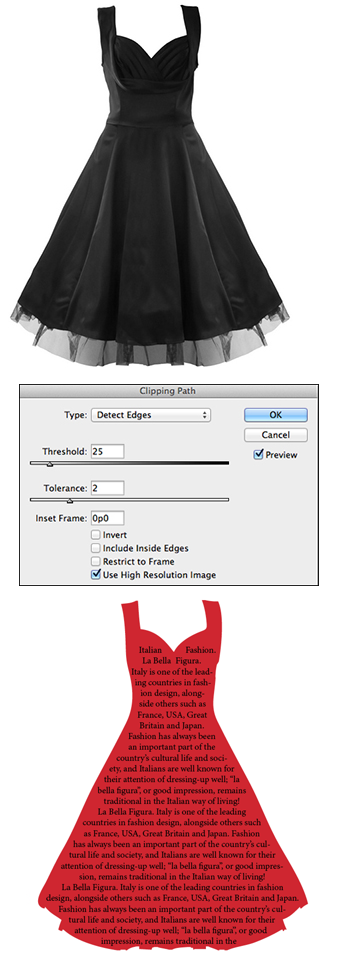
1. Place onto your layout a photo that contains a shape you’d like to use. If that shape in the photo already has a clipping path around it, skip to Step 4. If not, add a clipping path using Photoshop or select a photo that has a silhouette on a white background. (I chose the photo at right of a black dress on a white background.)
2. To add a clipping path to the photo in InDesign, choose Object> Clipping Path> Options. (Make sure you can see your photo behind the dialog box.) Check the Preview box and choose “Detect Edges” from the Type popup menu. When your desired shape is on a white background, it’s easy for InDesign to detect its edges. Play with the Tolerance setting until you see a shape of anchor points on the photo that looks good to you. Choose OK.
3. Now you have a photo with a clipping path around it. But if you delete the photo in order to retain the shape, the clipping path also gets deleted. To get rid of the photo but retain the shape, you need to convert the clipping path into a frame.
4. With the photo still selected, choose Object> Clipping Path> Convert Clipping Path to Frame. This converts the clipping path into a graphic frame. Now switch to the Direct-Selection tool (white arrow), select the photo inside the path and delete. Voila! You have the shape you want in the form of a frame!
5. To fill the frame with text, just click on it with the Type tool and fill with your text of choice. Or place another photo inside it or fill it with a swatch color.
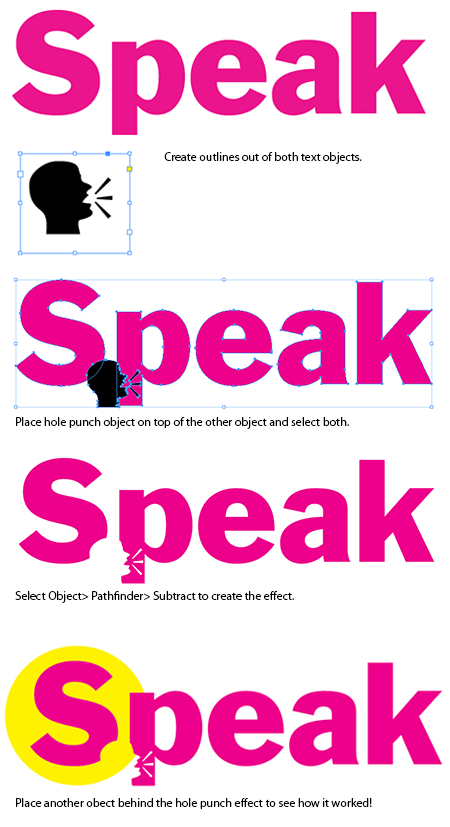 1. Draw a text frame. Enter text and style it, making sure it’s large enough to punch a hole out of.
2. Draw a second text frame. Go to Type> Glyphs and find a font that has icon characters, like Webdings or Wingdings. Find a single glyph character you like and double-click it to insert it into the text frame. Make it big enough for it to act as a hole punch.
3. Select both text frames and choose Type> Create Outlines. Those pieces of text are now graphic frames.
4. Drag the hole punch object (the glyph) on top of the bigger text object and then select both. Go to Object> Pathfinder> Subtract to use the topmost object to punch a hole out of the bottommost object. Done!
5. If you want a better idea of the effect you created, add an object behind your hole-punch effect. You’ll see it’s not a white object, but actually a hole punched out of the type.

TIP: You can use this same technique using multiple hole-punch objects. Just make sure the object you want to punch holes into is always at the bottom of the stacking order.